














Remembering the Events of September 2001
Plymouth, MN; September 11, 2026 – As the United States pauses today to remember the lives lost on September 1…

Built for how enterprise networks work today.
Lantronix Centralized Management Software

By: Russell Fretenburg, Technical Product Manager, Lantronix, Inc.
Lantronix recently introduced the Open-Q 610 µSOM and Development Kit, based on the Qualcomm QCS610 system-on-chip (SoC), and this article provides detailed instructions on how to install and run a couple of demos to show off the powerful capabilities of the platform out of the box. The QCS610 is built specifically for advanced IoT vision intelligence applications, with exceptional power and thermal efficiency, advanced image signal processors, digital signal processor, connectivity, and security. The QCS610 platform is designed to support the following key capabilities:
The platform SW is a Linux release based on Yocto Thud (v2.6) with built-in support for the GStreamer multimedia framework, including Qualcomm-added GStreamer elements for control of QCS610 specific features, such as camera source, HW encoders and decoders, Wayland display sink, and various AI-specific elements.
As described in the Qualcomm blog post, “On-device AI with Developer-ready SW Stacks”, the Qualcomm QCS610 includes powerful AI capabilities, right out the box. Combining this full-featured SW with the Lantronix Open-Q 610 µSOM Dev Kit and available camera and display accessories enables demonstration of the AI framework with minimal effort.
This article explains how to set up the Open-Q610 µSOM Dev Kit with camera and LCD accessories, how to connect it to your network, and how to run a couple of GStreamer demos to show how easy it is to get started with multimedia and AI use-cases on the Open-Q 610 µSOM Dev Kit.
This Tech Talk demonstrates the ease with which users can get started on vision AI projects with the QCS610 SoC and Linux AI software stack, with the Lantronix Open-Q 610 µSOM Dev Kit and accessories.
Tech Talk: On-device Artificial Intelligence

See Figure 1 below for a picture of the setup with Dev Kit, LCD, two cameras, and a Linux PC for the ADB connection.
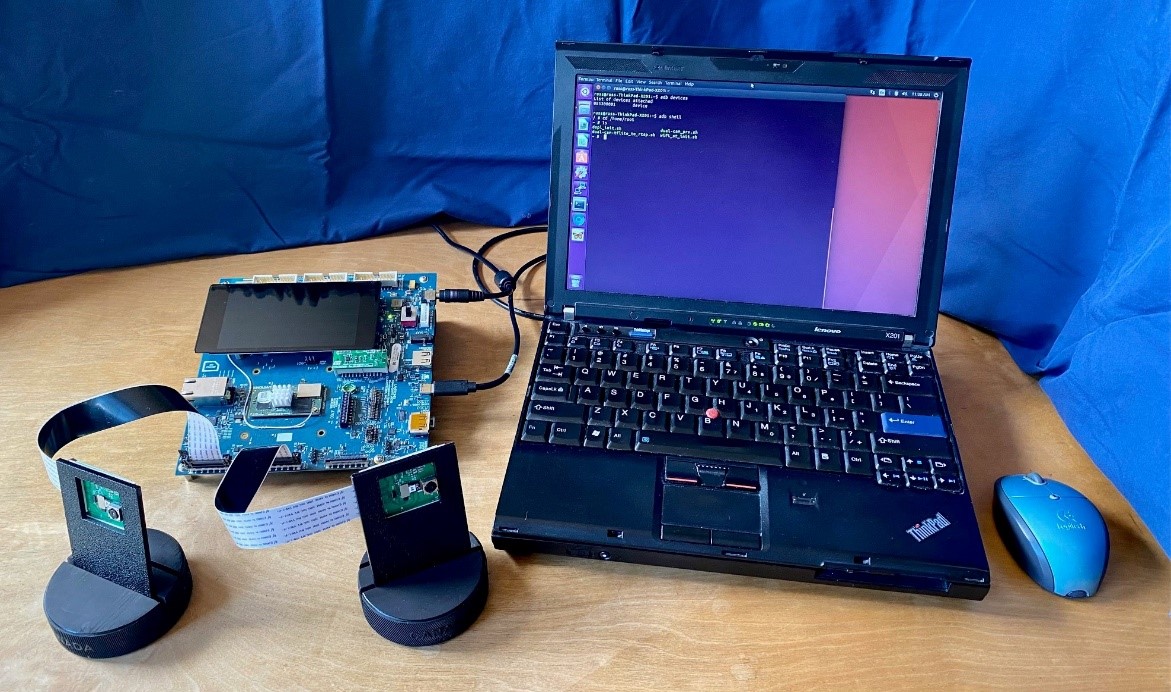
Figure 1: Demo Setup with Two Cameras Attached
Assuming you are starting with a new Open-Q 610 dev kit with freshly installed OS SW (either fresh from the factory or if you have reinstalled it), a few steps are required before we can copy files to it or make other changes:
$ adb devices
List of devices attached
085300001 device
$ adb root
$ adb disable-verity
Slot is _a
Verity disabled on /
Now reboot your device for settings to take effect
$ adb reboot
$ adb shell
/ # mount -o rw,remount /
/ # exit
$
Four shell scripts are used for this project and they are available online from the Lantronix Open-Q 610 Embedded Compute Portal at: https://tech.intrinsyc.com/projects/open-q-610-usom-dev-kit/files
Open-Q_610_Streaming_Demo_Scripts.zip
dspl_init.sh
wifi_st_init.sh
dual-cam_prv.sh
dual-cam-tflite_to_rtsp.sh
$ adb push dspl_init.sh /home/root/
$ adb …
$ adb shell
/ # cd /home/root
/ # chmod 755 dspl_init.sh
/ # chmod …
$ adb shell
/ #
/ # vi /etc/misc/wifi/wpa_supplicant.conf
network={
ssid=”YOUR_SSID_NAME“
proto=RSN
key_mgmt=WPA-PSK
pairwise=CCMP
group=CCMP
psk=”PASSWD”
}
/ # cd /home/root
~ # ./wifi_st_init.sh
Successfully initialized wpa_supplicant
udhcpc: started v1.29.3
udhcpc: sending discover
udhcpc: sending discover
udhcpc: sending select for 10.0.0.32
udhcpc: lease of 10.0.0.32 obtained, lease time 86400
/etc/udhcpc.d/50default: Adding DNS 10.0.0.1
~ #
~ # ./dspl_init.sh
Create output successful
Disable tool bar
~ #
Now that the basics are initialized, we can demonstrate a dual concurrent camera use-case that uses a gstreamer pipeline to stream video from each camera, combine them into one stream using the qtivcomposer gstreamer plugin, and then display the combined video on the LCD panel.
Figure 2 below shows a flow chart of the gstreamer pipeline created by this script.
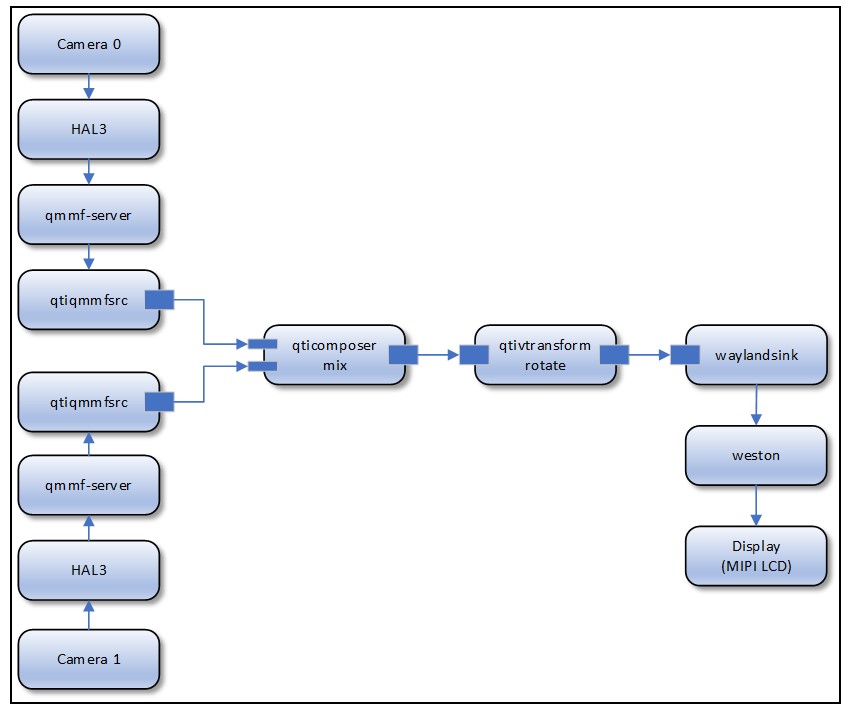
Figure 2: Dual Camera Preview Flowchart
~ # ./dual-cam_prv.sh
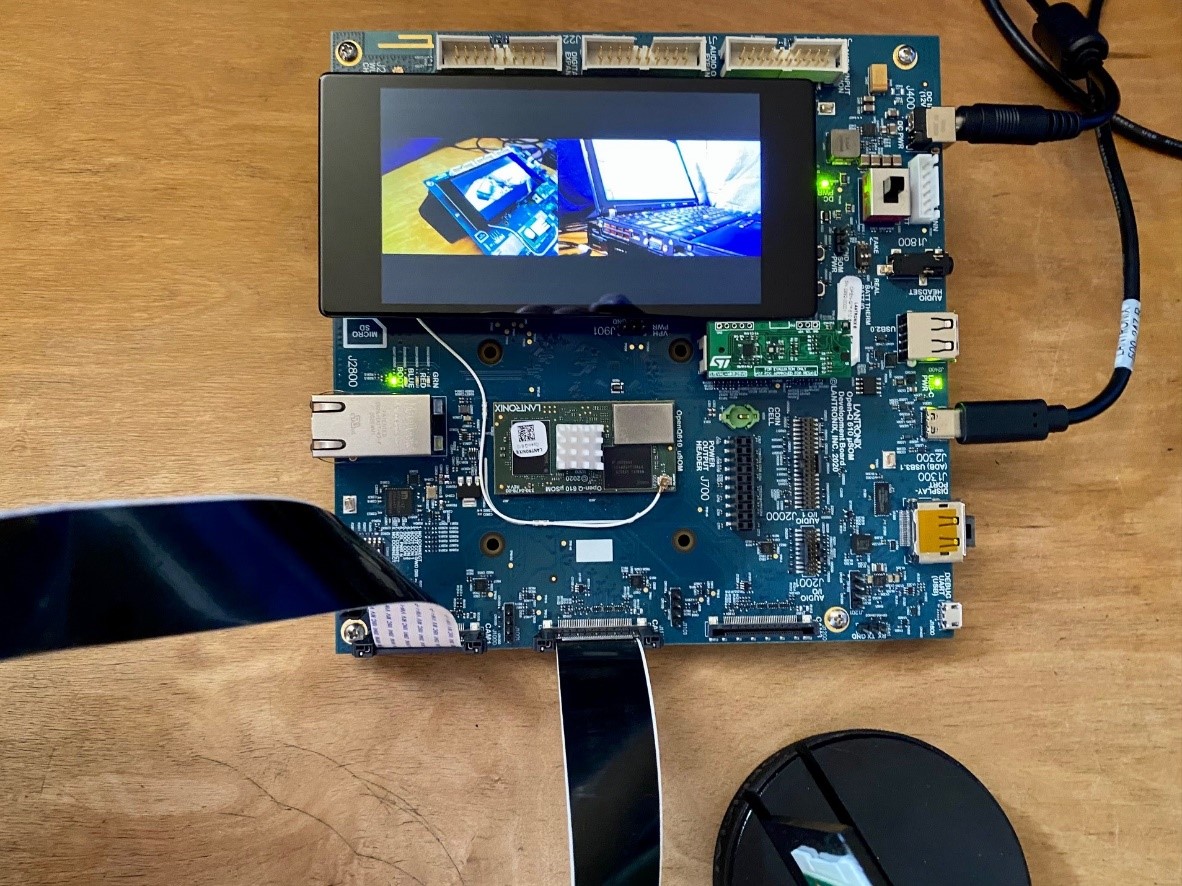
Figure 3: Dual Camera Preview Display on LCD
Taking things a few steps further, the next demo takes the video streams from the two cameras, runs them through a Tensorflow Lite live camera inferencing model, adds object boxes and labels, combines the two video streams into one, and streams the result over the network via rtsp. The resulting stream can be viewed using the VLC video player on another device connected to the network.
Figure 4 below shows a flow chart of the gstreamer pipeline created by this script.
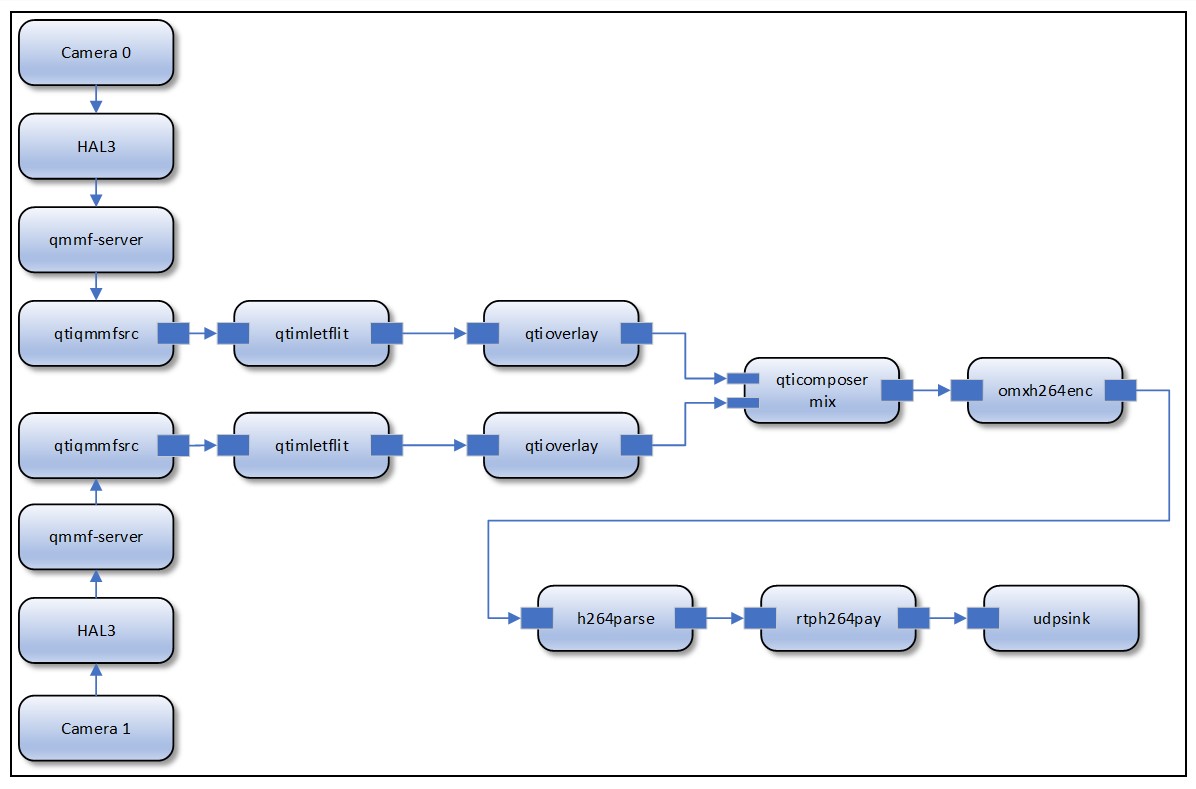
Figure 4: Dual Cam TF-Lite Flowchart
• This demo uses an example TF-Lite model from Google (https://www.tensorflow.org/lite). First, we need to download the model files and copy them onto the 610 dev kit.
• Download the coco ssd mobilenet model onto your PC from here:
https://storage.googleapis.com/download.tensorflow.org/models/tflite/coco_ssd_mobilenet_v1_1.0_quant_2018_06_29.zip
• Unzip coco_ssd_mobilenet_v1_1.0_quant_2018_06_29.zip.
• Copy the model and labels files onto the target device:
adb push detect.tflite /data/misc/camera/.
adb push labelmap.txt /data/misc/camera/.
• Now start the demo script to set up the gstreamer pipeline and start streaming. It will stream at the IP address of your Wi-Fi interface on port 8900.
$ adb shell
/ # cd /home/root
~ # ./dual-cam-tflite_to_rtsp.sh
Ctl-C to stop
Gbm_create_device(156): Info:backend name is: msm_drm
Stream ready at rtsp:// <dev kit IP addr>:8900/live
…
…
Gbm_create_device(156): Info: backend name is: msm_drm
• Note the address output above that you will need to receive the stream in the next step.
• Now you can connect to the stream from a PC, phone, or tablet connected to the same network as your 610 dev kit, using the VLC video player.
• Select “Open Network Stream” from the “Media” menu and enter the following:
rtsp://<dev kit IP addr>:8900/live
• You should now see something like the below image from the VLC player – two separate video streams with objects detected and labeled.
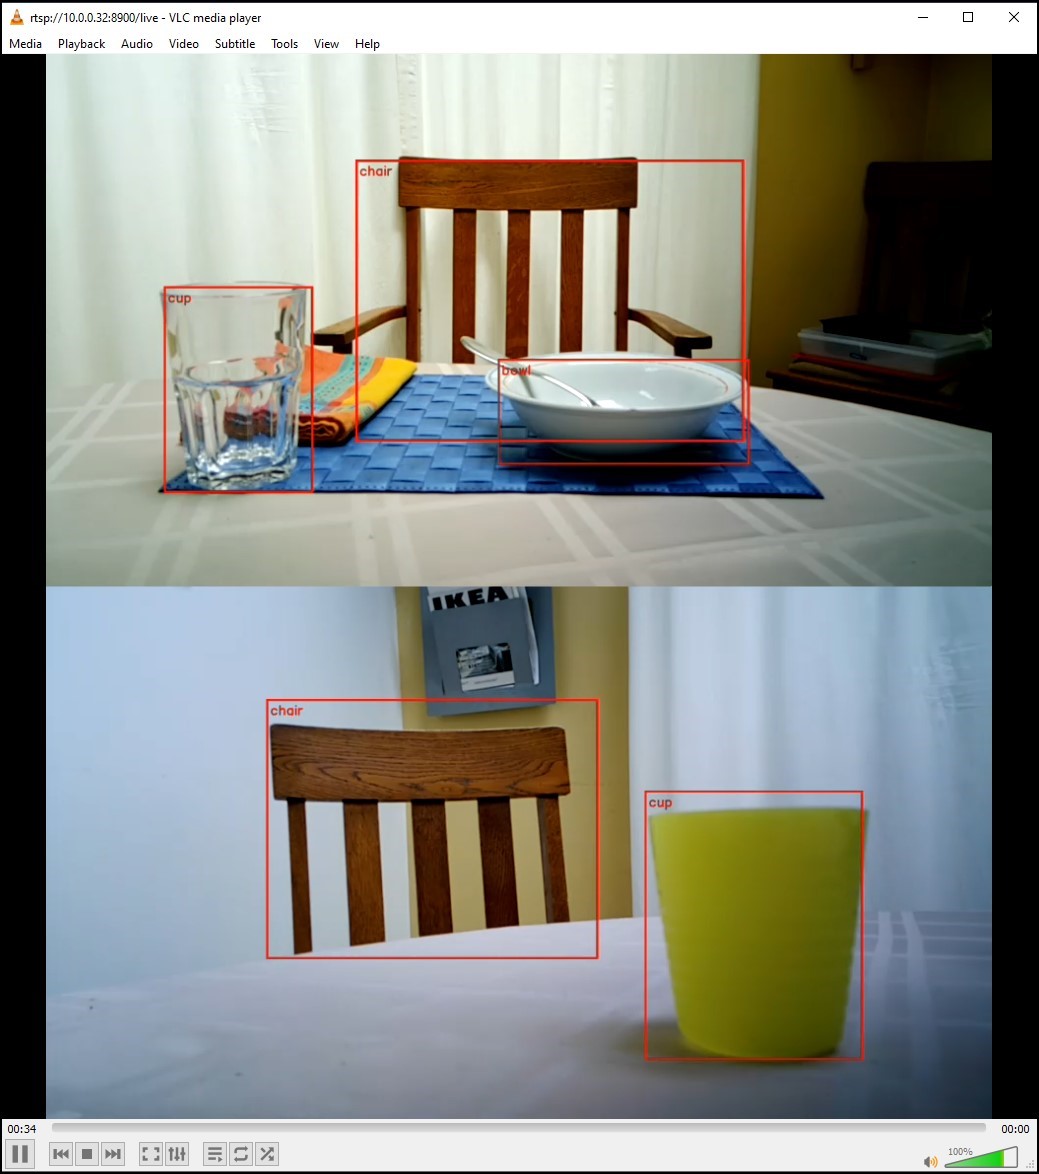
Figure 5: Dual Camera TensorFlow Lite Demo Output
This article has shown how quick and easy it is to get started with embedded on-device AI applications using the Lantronix Open-Q 610 µSOM Dev Kit and accessories running the Qualcomm QCS610 AI SW stack. We have seen how multimedia and AI use-cases can be prototyped quickly using a few lines to set up a gstreamer pipeline. Many different configurations can be set up similarly with different example TensorFlow Lite models from Google, such as image classification, pose estimation, segmentation. The QCS610 SW stack also supports executing ML models from the Qualcomm Neural Processing SDK to provide the flexibility of developing your models on a variety of industry standard frameworks such as TensorFlow, TensorFlow Lite, ONNX, and Caffe2.
If you do not yet have an Open-Q 610 µSOM Development Kit you can get yours here:
https://shop.intrinsyc.com/products/open-q-610-usom-development-kit
Author: Russell Fretenburg, Technical Product Manager, Lantronix, Inc.
Plymouth, MN; September 11, 2026 – As the United States pauses today to remember the lives lost on September 1…
Percepxion and SLC 9000 Join the NetClaw Community Network admins are actively exploring AI that targets their…
Built for how enterprise networks work today.
Lantronix Centralized Management Software